
New Project
|
|


Create a new HCADwin project and draw simple logic:
After this lesson you can create a new project, Cut Copy Paste symbols, navigate through all pages, create a New Page, give it a Title, Select a new symbol, give a Tag some extra details.
After starting HCADwin or closing the active project you will see the next screen (some screens are updated when using a newer version of HCADwin, but the basic functions always remain):
As you can see, only two tool buttons are available: "New Project" and "Open Project". When opening with a menu command you will find some more options, like opening previously opened projects. Try "Options, Select Language" and choose "2" for English. You have to stop and start HCADwin before the new language to take effect. For now, click on "New Project" tool button on the top left corner.
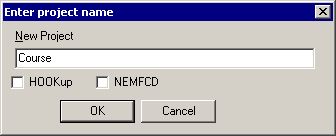
This dialog box appears. Give a project name (COURSE e.g.), no path and click OK.

You will see the above screen (normally full screen, but this window is made as small as possible). Let me explain what you see.
First of all you actually made a copy of the HCADwin.HWI project, which is used as a template. As you can see on the bottom left, page 020 is shown. The other numbers in the white tabs are page 005 (cross-reference page) and page 002 (index page) which have been visited earlier in the HCADwin project (even those attributes are copied).
Just click on those page number tabs and see how the drawing content changes and how the tabs underneath reflects your actions.
Try <Page Up>, <Page Down>, <Home> and <End> (page keys) also.
Notice the N in the middle of some arrows. Click on those arrows and discover how they reflect the page keys.
The N stands for New page. Try it and answer with both existing and not (yet) existing pages. (no leading zeros needed)
Notice that more tool buttons are available. You could now save the current project, print it, search for a tag, compile or run it. Not very useful now on an empty project. When saving your project, the empty pages will be deleted. This is the only means of getting rid of pages, besides changing the page type into "deleted".
Get rid of the stuff on the first logic page. We want to insert our own logic.
As a lesson we are going to use the cut, copy and paste buttons:
 The cut, copy and paste buttons are grayed. Let's do something about that and delete all symbols (one shown) on this first page:
Put the cursor (the blue cross) above and on the left of the Hcat logo (the "Demo" symbol). Left mouse button down and keep it down while going to the right and underneath the Hcat logo. You will notice a selection rectangle. (here the cursor is on the down-under position just are releasing the mouse)
At the same time the cut and past tool buttons get the active color. Click on "Cut" and the selected symbols will disappear.
Paste will be possible now either on this page or another. (Keep the mouse button down when using the tool button, it is possible to change the position of the block)
The normal windows keys (Ctrl X, Ctrl C and Ctrl V) will work also.
Try to make some copies on different places.
End the copy/paste session by leaving page 020 completely clean. You will still see a border and the four vertical lines. Use the vertical scroll bar to see what the printed page will look like.
Pages must have a title. So we provide our empty page with a title.
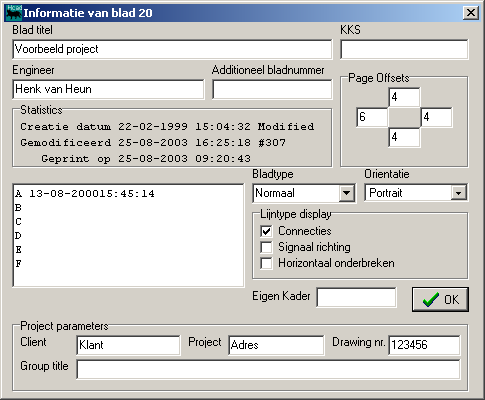
Try a B command. Like all HCADwin commands, just press the key on your keyboard. b or B means the same. In this case the next window pops up, expecting you to fill in an appropriate title for this page, (Please do) and for the first time the name of the engineer (this name will be copied when creating new pages). You could now adjust the revision information. The offsets are used to see the border lines. Only alter them when needed for printing (to punch holes on the sides for instance).
Close this window with "OK" or F9 (F9; can be used in many windows as a shortcut).
HCADwin shows the changes immediately. Use the vertical scrollbar to visit the bottom of the page.

The above window shows the new entered information. The HCADwin logo's may be substituted by your own, but I'll come to that later. Actually everything you see can be altered, except for the four vertical lines which indicate this page type "Normal".
Notice that the word "Modified" can be seen. It is an indication that this page on screen differs from the one in the HWI file.
Note also that HCADwin shows the full path of the project in the top line and the projectname itself in the first tab.
Now get familiar with the navigation and zoom commands. Use the zoom tool buttons (or Ctrl + and Ctrl -) and the scrollbars (or numeric keypad + and -/Shift + and Shift -) to get on your screen what you want to see of the page.
Before we will create new pages, tell HCADwin that we are going to use the English language.
Find your way through the menu commands: "Edit, Settings" and click on "English". This will change some general texts. It can be undone at any moment. Note that the arrangement of menu commands depends on the HCADwin version.
 We will start with a new page, say 024. So click the N. And enter the page number.
A new page will be made. The N command could also be used.
Position the cursor on the middle of the page (near the top) and right click with your mouse.

You will see a popup window in which the keyboard commands can be seen which were relevant for this phase of drawing. To Insert a new symbol, select the "I: .." line and click.
Note that what happens next could be done with the I command directly.
The symbol selection window will show up. At first it will show the symbol groups with a + sign in front. Click on the "Logic" group for the logic symbols like "And" and "Or".
Double click on the group names will do the same. A group will fold again after clicking the - sign or the second double click.
Select an "And" symbol. Notice how the selected symbol is shown on the previous cursor position in blue.
Try selecting other symbols. After double clicking a symbol, or clicking for the second time on the same symbol, the selection window disappears and the chosen symbol will be moving when the mouse is moved (or cursor arrows are pressed).
Note that that the symbol turns black after clicking (or Enter)
The above window shows the symbol selection process in progress. The logic symbols are always drawn on grid (a quarter of the grid is shown as the dots).
After placing the symbol, try the M for Move command with the cursor on the symbol. It will turn magenta and can be placed anywhere between the lines.
You will notice that every symbol can be confined in it area.
Logic symbols belong to the logic area. Input symbols (and references from other pages) belong to the input area on the left. Output symbols (and references to other pages) belong to the output area on the right. Text or typical drawing symbols may be placed anywhere.
Try the C for Change command with the cursor on the symbol. It will turn green and can be resized.


Add an input symbol (Mnemonic "In") on the page and give it the tag "INPUT1".
Avoid PASCAL keywords for your tagnames when you want to simulate your logic later.
Use the C command on the input to get the TAG details screen for filling in the database fields.
Note that the Service, Qualifier and other fields are white. When aqua (=light blue) it is an indication that the TAG is nonexistent in the database and HCADwin assumes the text can be copied from an earlier used tag. You will notice that only when copying symbols.
Connect the input with the And symbol by putting the cursor at the right height en giving a H command.
Just inserted the Horizontal line with the H command.
Complete the above logic program by adding a second input and an output ("OUT") and connect them with lines.
Try the R for Rubber banding command on the And symbol. Notice how the symbol and lines turn red while moving and how the lines restore in proper horizontal and vertical lines when clicking (or Enter) to leave rubberbanding mode.
Congratulations! You made your first logic in HCADwin.
Don't forget to use the B command to fill in a title like "First AND gate", otherwise the index page doesn't show very much.
We can now save the project by command or by closing HCADwin. Inspect the "C:\HCADwin\COURSE\" directory with your explorer. Other location needed? Just move it.
What we have learned:
- Create a project by clicking the first tool button and entering a project name. HCADwin creates a directory and some files using the project name.
- Create a page and give it a title.
- Use cut and paste buttons to delete many symbols and lines together. Also to get an empty page fast.
- Navigate through pages by using commands, recent-tabs of navigate buttons.
- Add some symbols on the page and connect them with commands.
- Use the M(ove) and C(hange) commands to place and size symbols (and enter tag related information)
- Use the R(ubberband) command to place symbols with connections elsewhere.
