
Simulating the logic
|
|


Simulate the logic
Now we will execute the logic. This will take some steps:
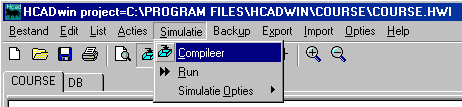 Compile your project. Use the menu command "Simulation, Compile" or press the compile tool button directly (blue basket).
HCADwin starts compiling the project in the background and shows the status bar in aqua while doing so. Be patient now, if an error occurs the compilation results are shown in an edit window. Normally this will only happen if some variables are both used are reals and as Boolean, so there is a type conflict. Remember the error lines and goto "List, List Pascal" in order to see the code for yourself. The cursor can be placed on the error line (shown above) so you can see which tag to search for.
I assume you didn't made mistakes, so the compiling process was correctly ended. COURSE.DLL was created (and some other Pascal source files).
Now you can start HCsimul by pressing the Run-tool button (the double right arrow).
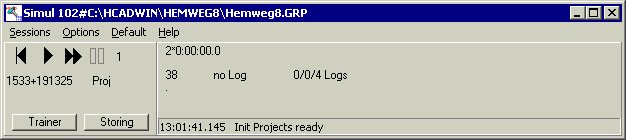
Let me explain what you see: In the caption of this new task your project can be seen, this is the DLL, which is going to be executed or a group of DLL's. Before the # sign the number 102 tells you that 102 DLL's are going to be executed. (When grouping projects, like this example using the GRP file, the number is higher than 1. When a "0" is encountered, you need to fix some error and compile again).
Try "Options, Toon pakketten" and you will see a list of executable projects (or a "?" before it when something was wrong)
HCsimul will show four buttons:
- Initialize. Implicitly done after you started HCsimul, but handy when you want to start again.
- Single step. Advance the simulation time by 100msec, that is to say: run your complete logic only once.
- Run. Real time execution of your project. 10x/sec.
- Stop. Takes a break, you could later continue running again.
So Run your project and notice the HCADwin screen, which mimics what happens.
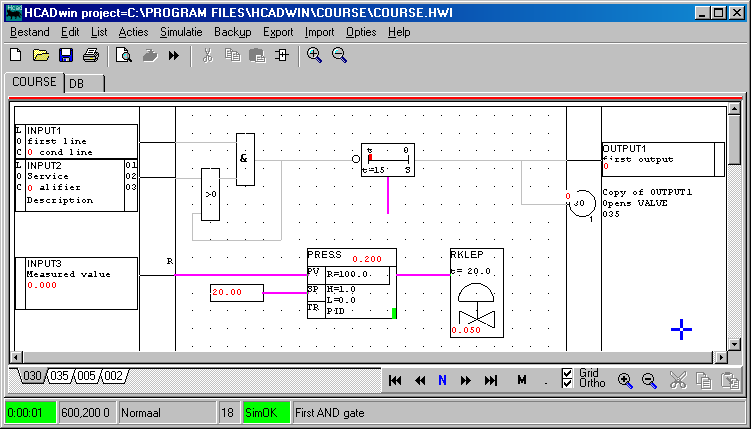
Let me explain what I did to create the above picture. I didn't press "Run" but 10x the single step to advance 1 second. HCADwin show you the simulation time on the status bar in green. As you can see all lines are gray, the all transport zero's as you can see on both inputs and outputs where the red zero's are also show.
The SimOK means that the compiled logic matches the shown logic.
The timer show a small progress, a thick red line will be seen after 15 seconds. The PID PRESS shows 20% output, but the slow valve RKLEP only managed to open for 5%. Note the 20% PID output reflects the SP=20 minus PV=0 and the scale R=100. It looks as if the PID controller has a PRESS_P=1 and a PRESS_I=0 and a PRESS_D=0 (no D-action). Try a P command on the PID controller to inspect and/or change those properties.

I waited some seconds and now some lines are red. The RKLEP finally reached the desired value. Not that the cursor is put on a line and the status bar shows A4T=15, meaning the actual timer value is 15 seconds.
HCADwin shows the simulation mode by indicating the red line above the logic. It updates dynamically (refresh rate can be adjusted "Edit, Settings, Update Frequency" [200 msec]). In the run mode the left mouse click acts differently. You could still give a M command on the keyboard if you like, but the mouse click in lines or inputs now serves as a toggle for Boolean values. (Or asking for numerical values, which are accepted only by using F4 when leaving the window) Try clicking on INPUT1 and INPUT2. Click on the line between INPUT3 and PRESS, enter 25 and press F4. Click on PRESS and you'll see:
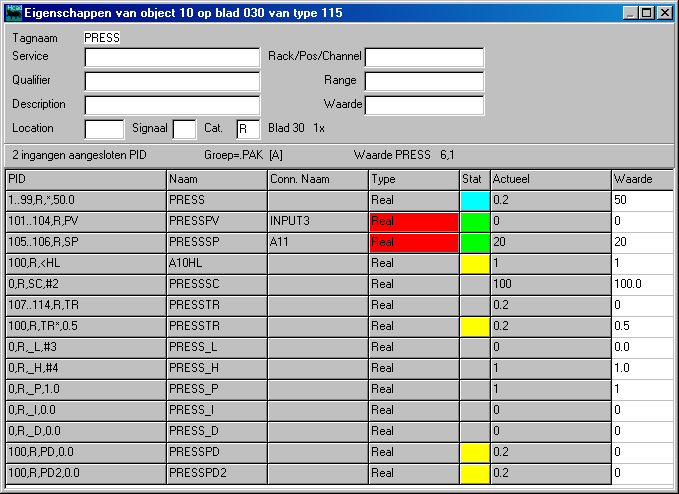
Because a PID block has a tag associated, you can fill the attributes here too.
More important is the grid shown underneath. What can be seen here are the following columns:
- PID, actually this shows the Mnemonic of the symbol. The variable declarations ("V" and "W" instructions in the LIB definition) of the symbol are shown here. Grid position 1..49 (right side) and 51..99 (bottom) of this PID block will show output variable TAG+* (giving PRESS) of type R (Real) and an initial value of 50.0. That's what the first row tells you. The second one specifies the first input (Grid position 101..104 is on the left) of type Real and an internal name (when not connected) of TAG+PV (giving PRESSPV). Note that illegal characters can be used, but don't show up in the resulting Pascal variable names.
- Name The resulting variable name. It could be a parameter if its used as an input only and not connected.
- Conn. Name If input lines where connected at the proper grid positions, the real variable is shown here.
- Type obviously the signal type. The field is colored red if the variable is connected, so the Naam variable doesn't exist in the database, but the Conn. Naam is used instead.
- Stat indicates in color whether or not it is useful change values. Aqua means input, green=output, yellow=internal use, gray=parameter.
- Actual shows the actual value in the database, it will be updated every second.
- Value shows the initial value. This value can be changed and will be the next initial value after compiling.
When entering values in the Waarde column, try PRESS_I=10.0, use the F4 key to enter it also in the actual database. F5 does the opposite.
The PID algorithm of HCADwin is a very easy one. By dividing (PV-SP) through the SC (scale) factor (can be negative for reverse action) the algorithm will act in the 0.0..1.0 range. The output however is scaled within High and Low limits (also clamped). The TR (tracking) value must be in the output range. When no TR is connected, the previous output is assumed. The algorithm just calculates the change in output and adds or subtracts that to TR. So manual/auto operation must be programmed outside the PID block.
(TIP: Use the H/A station to receive the PID output and a Manual output, and connect its output to the TR of the PID.
TIP2: when more PID controllers control one valve (using MAX or MIN functions for example) just connect all TR's to the ultimate output.)
I hope you can value this approach, because there is no integral windup involved and no extensive UNDO programming of the "intelligence" of normal PID controllers with too much functions)
Use F3 on a line or a symbol with a tag for monitoring:
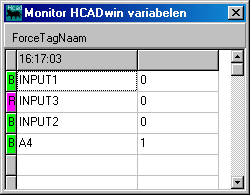
You'll see a list of max 50 variables. Just enter what you want, if the name is present in the database a color and a type-character will appear. For booleans: just click on the B for a toggle. Other types: also click and fill the appearing edit box. Use F4 to get it actual too.
Would you like to see a trend? Try F6 or T on the lines.
Would you have access to the HCADwin database in EXCEL or some SCADA? Just edit HCADDDE.HDE with notepad and make a list of all variables you want (Like PRESS or RKLEPPOS or OUTPUT1). Then start HCADDDE.exe. When using "=HCADDDE|Simul!PRESS" in an EXCEL cell, it will updated automatically.
What we have learned:
- Simulating goes in two steps: Compile first, Start HCsimul next.
- HCsimul offers single step, run pause and initialize facilities (also saving and restoring the complete database)
- After running HCsimul also, HCADwin goes into simulation mode. For fast handling the left mouse button acts a little different now, but that allows you to toggle booleans very quickly.
- PID controllers in HCADwin (as some more symbols) have many properties. Use the P command get show and alter them.
- F4 (or F5) are needed to download (or upload) variables from initial value to actual value.
