Print pages
|
|


How to print pages?
Print your project by clicking in the tool button with the printer icon. The following dialog will show:
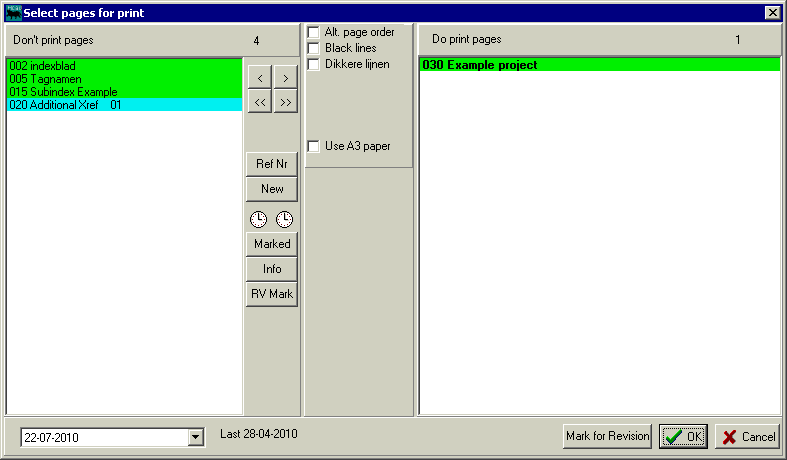
You will see two lists of page numbers and titles. On the right are the selected pages for printing. The bold title is the current page and is always put in the "Do print pages" list. By means of the arrow buttons you can transfer selected, or all, pages from the "Don't print pages" to the other list or back.
The "Nieuw" (or "New") button will select all pages changed after a revision command.
The left clock button will select all pages not yet printed after the date in the drop down box. You can easily change that date by using the down arrow button next to the date (on the left bottom) on the calendar which appears then. As a reminder the last print date is shown on the right of the clock. (isn't 1899 ages ago?? and on what printer?) The right clock button selects all pages changed after the previous print moment.
After pressing the Print button the standard windows printer dialog will appear. Select your printer and the paper size (could be A3 for control diagrams). Portrait or Landscape can be selected, but HCADwin will overrule those settings, because a project can contain both orientations and HCADwin will switch between them in order to print all pages within one command.
The current date will be stored in all printed pages. When issuing a B command when drawing, you will see the creation date, modify date and print date of that page.
The page titles are shown in a color related to the page orientation. For Portrait A3 it will be green. The current page is bold.
Use the "Make Excel Lists" checkbox in conjunction with one of the shown template lists to create a XLS.
What have we learned:
- How to print a project, all or selected pages.
- Page selections can be made according to revision or print date.
